
Payment Method
Introduction
In this section we will configure Atrato Pago as a payment method for customers to purchase their products.
Checkout
The following diagram showcases Atrato payment flow throughout purchase:
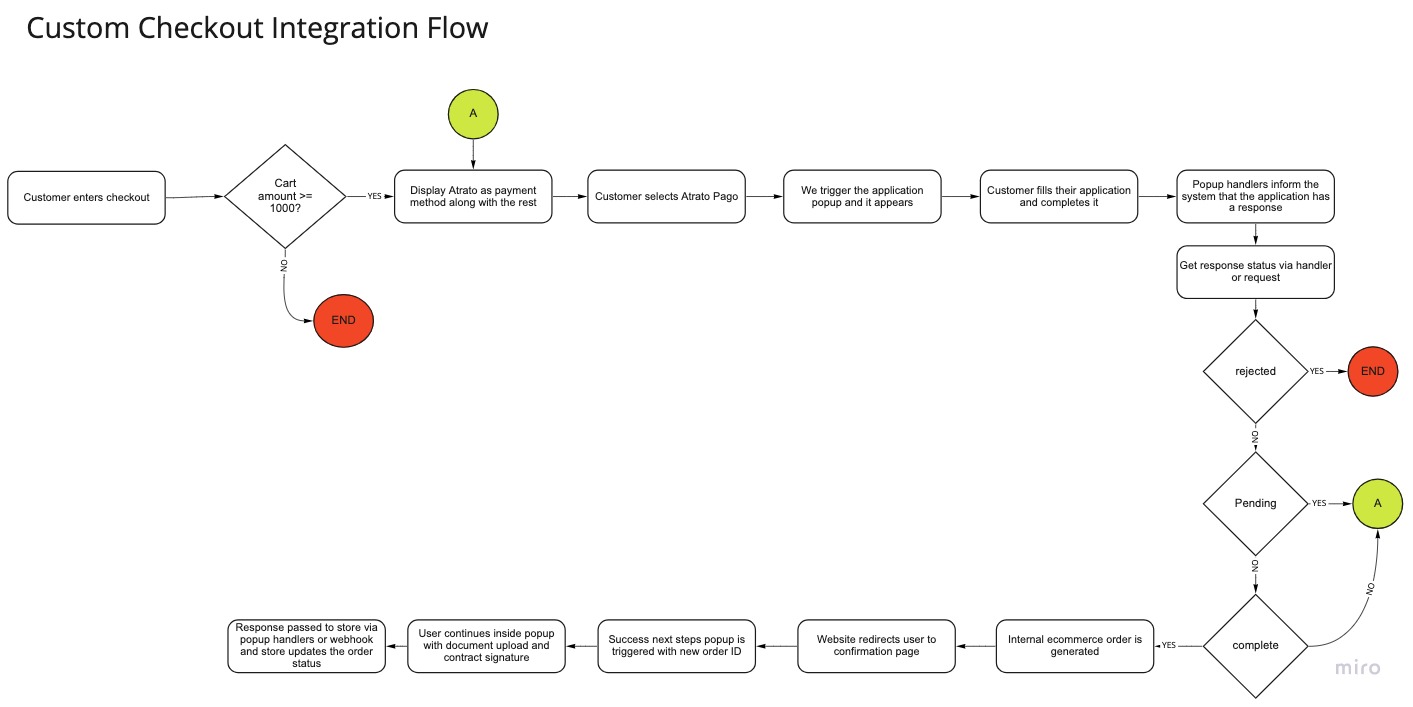
Notes before starting:
- A special key is needed to activate Atrato as a payment method. You can find your key by accessing our Partner Dashboard atratopago.com/v3/partner The key is found on the Webhook section ⇒ Key único. If you don't have a key, please contact support.
- Minimum purchase amount for a product with Atrato is $1000 mexican pesos.
- Atrato must be added as a payment method.
Payment process overview
- Atrato is selected as a payment method in your custom code platform.
- In the checkout page a popup will open, which will guide the user through onboarding and application process with Atrato. After the user submits their application, the popup will provide a response to let you know if the customer was approved or not.
- If the customer is appproved, an order can be generated in your platform and guide the user to the confirmation page.
Implementation
Step 1: payment method
Add Atrato as a payment method in your Payment Selection step of your checkout.
The description for this payment is the following
Display title
Atrato Pago - Paga en cómodas mensualidades sin tener tarjeta
Additional information
Selecciona Atrato Pago y podrás financiar esta compra hasta en 18 cómodas mensualidades, sin necesidad de tener tarjeta de crédito. Después de dar clic en "finalizar pedido", se te dirigirá a Atrato Pago para continuar con tu proceso de compra.
Step 2: application process
After Atrato is selected as a payment method, you must trigger our special popup which enables the user to make their application inside your platform.
You can find a showcase of how you can implement our Payment method plugin with this link inside the file: CustomCheckoutApplication.html
In this example you can know how to launch the popup with our SDK that was imported via CDN at the start of the guide, as well as catching responses for knowing when the user is approved or not.
This example was coded in vanilla Javascript, but you can adapt it to whatever platform suits your team.
Required checkout attributes
You must be able to recieve these pieces of information in your checkout:
- Payment method (to know when they selected Atrato and launch the popup)
- Product(s) description
- Order number
- Order ID (can be the same as the order number)
- Price
- customer email
- customer name
- customer phone number
When all information is recieved and Atrato is selected as a payment method, you can send them via the popup DIV attributes.
Attributes to send are the following:
| atributo | descripción |
|---|---|
| data-ordernumber="QUOTE" | Don't modify this field, must be sent always. |
| data-plataform="other" | Don't modify this field, must be sent always. |
| data-type="pago" | Don't modify this field, must be sent always. |
| data-version="2" | Don't modify this field, must be sent always. |
| data-orderid="#########" | identifier for your internal cart number or order number |
| data-idcommerce="#########" | Special ID which represents your store in our platform (can be obtained in the partner dashboard) |
| data-key="##################" | Base 64 encoded data consisting of: base64(Usuario:SecretKey) (These two fields can be obtained in the API section of the partner dashboard) |
| data-price="######.##" | Product(s) total price |
| data-product="Product description" | Product descriptions, if there is more than one, separated by comma |
| data-email="[email protected]" | Customer email |
| data-name="Customer Name" | Customer name |
| data-phone="############" | Customer phone numbersandbox.atratopago.com])(🔗 |
| data-urlhost="https://sandbox.atratopago.com" | Atrato URL, it changes depending on which environment you are in. -Production: https://app.atratopago.com -Sandbox: https://sandbox.atratopago.com |

CDN References
Sandbox
<!-- References for sandbox -->
<link	rel="stylesheet" type="text/css" 	href="https://sandbox.atratopago.com/ecommerce_plugin/highslide.css"	/>
<script	type="text/javascript" src="https://sandbox.atratopago.com/ecommerce_plugin/highslide-with-html.js"	></script>
<script	type="text/javascript" src="https://sandbox.atratopago.com/ecommerce_plugin/highslide-config.js" ></script>
Production
<!-- References for production -->
<link rel="stylesheet" type="text/css" href="https://app.atratopago.com/ecommerce_plugin/highslide.css" />
<script type="text/javascript" src="https://app.atratopago.com/ecommerce_plugin/highslide-with-html.js"></script>
<script type="text/javascript" src="https://app.atratopago.com/ecommerce_plugin/highslide-config.js"></script>
Special checkout popup component
<div
     id="higslide-div-atrato-info"
     data-ordernumber="QUOTE"
     data-orderid="7000000001" -- ID for cart is recommended here
     data-idcommerce="###########"
     data-key="#########"
     data-price="1000.99"
     data-product="Product name"
     data-email="[email protected]"
     data-name="Customer name"
     data-phone="33 3333 5623"
     data-plataform="other"
     data-type="pago"
     data-version="2"
     data-sandbox="true"
     data-urlhost="https://sandbox.atratopago.com"
     ></div>

<div id="messageData"></div>

		<script>
			function showMessage(textMessage) {
				document.getElementById("messageData").innerHTML = textMessage;
				return false;
			}
			new window.Atrato_Pago_Events({
				onSuccess: (data) => {
					showMessage(
						`Result: ${JSON.stringify(
							data
						)} <BR> Se ha generado la solicitud!. <BR>  Aquí redirecciona a la pagina de success`
					);
					setTimeout(function () {
						location.href = "CustomCheckoutSuccess.html"; // URL of success page in which you'll redirect
					}, 5000);
				},
				onPending: (data) => {
					showMessage(
						`Result: ${JSON.stringify(
							data
						)} <BR> Continua con tu proceso de solicitud con Atrato para completar el proceso.`
					);
				},
				onError: (error) => {
					showMessage(
						`Result: ${JSON.stringify(
							error
						)} <BR> Lo sentimos tu solicitud con Atrato ha sido rechazada.`
					);
				},
				onRejected: (data) => {
					console.log("On rejected");
					showMessage(`Has sido rechazado`);
				},
			});
		</script>
Step 3: Application completed
As shown in the code block above, when an application submission is completed we can validate the final result using the Atrato_Pago_Events onSuccess handler.
When you find that the application is approved, an order in your platform can be created with a pending status, meanwhile the user is redirected to the final process to upload documents and sign their contract.
An example on how to implement this Next Steps popup in your success page is provided in the Payment Method Plugin example file CustomCheckoutSuccesss.html
This popup needs information of the recently created order:
| attribute | description |
|---|---|
| data-type="documentos" | No modificar este dato. (Este dato siempre debe de enviarse) |
| data-urlhost="https://sandbox.atratopago.com" | Atrato URL, it changes depending on which environment you are in. -Production: https://app.atratopago.com -Sandbox: https://sandbox.atratopago.com |
| data-idCommerce="############" | Special ID which represents your store in our platform (can be obtained in the partner dashboard) |
| data-key="##################" | Base 64 encoded data consisting of: base64(Usuario:SecretKey) (These two fields can be obtained in the API section of the partner dashboard) |
| data-quoteId="#########" | identifier for your internal cart number |
| data-orderId="######" | Order number generated after the application was approved by Atrato |
| data-orderNumber="#######" | It can be the same as data-orderId |
| data-sandbox="true" | Determine if you are using sandbox or production environments:
|
CDN References
Sandbox
<!-- Sandbox references -->
<link	rel="stylesheet" type="text/css" 	href="https://sandbox.atratopago.com/ecommerce_plugin/highslide.css"	/>
<script	type="text/javascript" src="https://sandbox.atratopago.com/ecommerce_plugin/highslide-with-html.js"	></script>
<script	type="text/javascript" src="https://sandbox.atratopago.com/ecommerce_plugin/highslide-config.js" ></script>
Producción
<!-- Production References -->
<link rel="stylesheet" type="text/css" href="https://app.atratopago.com/ecommerce_plugin/highslide.css" />
<script type="text/javascript" src="https://app.atratopago.com/ecommerce_plugin/highslide-with-html.js"></script>
<script type="text/javascript" src="https://app.atratopago.com/ecommerce_plugin/highslide-config.js"></script>
Atrato success next steps component
<div
   id="higslide-div-atrato-info"
   data-type="documentos"
   data-urlhost="https://sandbox.atratopago.com"
   data-idCommerce="##########"
   data-key="################"
   data-quoteId="7000000001"
   data-orderId="70003"
   data-orderNumber="0070003"
   data-sandbox="true"
   >
</div>
Notes
- It is very important that the order is created with a pending status when the user gets approved, since the user has not signed their contract at that point.
- For correct functionality in Atrato_Pago_Events it is necessary to configure the Webhook in the partner dashboard.
Updated about 1 year ago